Sunday, November 20, 2011

I'm alive, really

I know I only have a smattering of readers, but I apologize to you all for going awol these past several weeks. I hope I did not create the impression with my moribund last post about the death of one of our cats that I was too grief-stricken to write.

The truth is that my job for the past several months had been building to a crescendo that climaxed the last weekend in October. Lots and lots of 12-hour workdays in September and October meant little time for beading or blogging. The past few weeks since then I've using my weekends to get my Life Beyond Work back on track, reacquainting myself with cooking and laundry and my husband. (I still haven't caught up with my blog reading.)

Any spare time I've had in November was devoted to preparing for a crafts show at Mount Vernon Unitarian Church in Alexandria that took place yesterday. All in all, I did pretty well, and it was a very well-run show with lots of gracious volunteers. (Thanks, Patti, for getting me on the list!)

So now I'm in recovery phase #2. There is going to my an informal crafts show on Dec. 2 at my office, but that's not anything I have to knock myself out for.

The pic is of some beaded mouse ornaments I made for the Alexandria crafts show. (I made the snowflake, too, but did not sell them at the crafts fair. ) Lots of people admired my little mice, but I didn't sell a single one. And of course they were the thing I stayed up until 1 in the morning making the previous week, beading those tiny little skirts. (I sure hope the office folk like them; otherwise, my relatives are getting them for Christmas presents!)

P.S. Plans are afoot to bring some new kittens into our lives. The Feline Foundation of Greater Washington, is on the case for us. We adopted our other cats from them, so I can personally vouch that they have the greatest cats in the world.

Thursday, October 13, 2011

Goodbye, beloved Cyprus

We had to say goodbye to our cat Cyprus today. She was 12 years old and lived a happy life up until the end. We named her Cyprus because she was from that country. She was flown to Washington along with a dozen other kittens by a State Department worker stationed in Nicosia (the capital) who spent hundreds of dollars to transport these strays to a better life in America. We adopted her from the Feline Foundation when she was about 10 weeks old.

Cyprus was a Christmas present for our daughter when she was in the first grade. Rosalie picked her out from a dozen kittens at a foster home.

She was our first cat, and came to define "cat-ness" for us. Although we still have Seymour, our gray tabby, our empty nest just got a little emptier.

I wish I had better photos of her. In the one above, she looks like she's auditioning for sci-fi film, and in the one below, she's pissed off about something.
 No photo could capture her sweet purr. She could purr so loud you could hear her in the next room. I think I will miss that most of all.

Monday, September 26, 2011

Art on the Avenue

I've completed several new necklaces and earrings in the past few weeks, but without a camera, I can't post pics. So I'll plug Alexandria's Art on the Avenue instead--it's the reason behind my (relatively) prodigious (for me, at least) output.


Look for me at booth #150E. I'm sharing space with Patti North of All Fired Up! (And if you can't make it, please at least throw some karma our way to keep rain at bay.)

Saturday, September 17, 2011

My reveal for the biggest bead soup blog party ever!

Welcome all blog hoppers making their way through cyberspace, attempting to visit all 362 blogs participating in Lori Anderson's 4th Annual Bead Soup Blog Party! Lori, What an amazing output of creativity and good vibes you have nurtured into existence with your ingenious idea.

I was paired with Jane Haag of MJane Designs, who sent me these gorgeous beads last month. Please pause a moment to admire her lovely handmade clasp and silver-wrapped focal:


This is her own photo of the goodies she sent, and she has helpfully labeled the stones. These soft, pale shades of green are one of my favorite color palettes, so I knew I would love whatever I wound up making.

You'll see that she has wrapped a few of the stones into links, and that inspired me to do the whole necklace that way.

I sandwiched the little jade-like cubes between two silver chip spacers before making links out of them.

From my own stash, I used two-hole spacer beads to create the two tiers of links. It's hard to tell from the photo, but they have a shiny olive finish. I also threw some diamond-shaped silver beads with a kind of Celtic engraved pattern into the mix.

I have to once again apologize for the quality of my photos. My sister mailed me my digital camera--which I had stupidly left behind in a Cajun theme park in Louisiana last month while visiting her. It got rained on (it was in a canvas case) and I thought it a miracle that it was still working.

I took several photos of my necklace with it this evening and it seemed fine. But my luck ran out when I tried to download the files to my computer. No go. So once again I have to rely on my cellphone camera for photos.


Here's a view that shows the clasp.

And below is a closeup of the ice quartz focal. It has this mesmerizing depth to it, doesn't it?

I can't wait to see what Jane has done with the mix of stones I sent her.

(Oh, and if you're not part of the blog hop and have no idea what I'm talking about, your first stop should be the Bead Soup Blog Party site. You can read all about it and find the links of all 362 participating blogs.)

Saturday, August 27, 2011

Live-blogging Hurricane Irene!

OK, that title is a bit of a tease. The full force of the hurricane is supposed to pass through the Washington, D.C., area later tonight and last through tomorrow morning. Right now, as of 4:30 p.m., it's intermittently pouring and the lights are occasionally flickering.

I am way, way overdue for a post about the Bead Soup Blog Party. The beads from my partner, Jane Haag, were waiting for me when I got back from Austin last weekend. She sent me a lovely assortment of aquamarine and amazonite beads, among others, with a focal of green ice quartz and a handmade silver clasp.

I apologize for the quality of this photo, which was taken with my camera phone. It does not do justice to the beads.
Bead soup bounty from Jane Haag

Why am I using a camera phone? Um, funny story. My digital camera apparently decided it needed a longer vacation than I did. So while I was playing tourist at Vermillion Village in the heart of Cajun country (visiting my sister in Lafayette, La.), my camera stayed behind to catch some more zydeco. I didn't realize it had escaped until late in the evening, and we had to leave early the next morning for Austin.

My sister later retrieved it (thank you, kind and honest soul, who turned it into lost and found), but I guess she has yet to coax it into a box, because I haven't received it yet.

I know I will have fun playing with Jane's beads. I love this shade of green, and this combination is very much something I would wear.

Saturday, August 6, 2011

It's my party and I can blog if I want to

Woo-hoo, I'm going to be participating in Lori Anderson's Bead Soup Blog Party. I did a bead swap with the affiliated Yahoo group a few months ago, but this is the official big event that's open to all comers (as long as you have a blog and sign up during the three-daywindow). I don't know how many beaders signed on, but my name was in the 200s.

This is the fourth swap event, but it has already spawned several magazine pieces and a book that's coming out in October. And it has won Lori legends of fans. I'll be in Austin by time the beads are due to be mailed out, so I'll have to get mine out before we hit the road this weekend.

My technical accomplishment of the day was to figure out how to successfully paste the html code into a Blogger gadget to get Lori's blog party button to come up over in the right-hand column. (I appear to have been less successful in creating a custom Favicon to get rid of the annoying Blogger logo--I think I downloaded one correctly, but it's not showing up. Maybe it will after I post this. Or maybe it only shows up when I post on other sites.)

I have been working on another kumihimo rope, this one in red, but I don't have any pics to show. So how about I paste in this pretty snapshot from the University of Texas, where I'll be dropping off my daughter in just over a week.

Texas Exes, Your Tuition Dollars at Work

(Not that I went to college anywhere warm, but they didn't have amenities like this on campuses in MY day.)

Sunday, July 31, 2011

The long-overdue post about the magnificent book Beaded Colorways

Several weeks back I made mention of the book Beaded Colorways and how I intended to blog about it, but was having computer difficulties at the time. Well the keyboard's fixed, the crafts show is long past, so here is my tribute.

I want to declare up front that I don't know the author Beverly Ash Gilbert; I had never even heard of her until I plucked this book off the shelf at my local Borders. (And let's wander off-topic for a sec and all shed a tear for the fact that none of us will be plucking books off Borders shelves anymore.) It's just that I am too novice a beader to be able to offer lots of firsthand advice, so the best way I can make this blog useful is to trumpet a golden resource when I stumble across one.

The cover grabbed me right away--I thought, wow, I want to make THAT. It was exactly what I had been looking for--some way to marry my structural seed bead weaving with the many other types of beads I have--pearls, crystals, random glass beads, stone chips, nuggets.

The necklace on the cover is freeform netting. I have seen lots of freeform beadweaving projects in the beading mags, but frankly, most looked, well, messy to me. Unbalanced. Clashing colors. Perilously constructed. But thanks to Beverly's clear instructions and color guidance, I was able to produce the necklace below as my very first attempt at freeform netting:

Obviously, my piece is monochromatic and does not have the shifting color gradations of hers. But I had confidence in my bead soup mix, thanks to her step-by-step instructions for building complex bead soups with "shadows," "highlights" and "sparkle."

There are tons of books out there on color theory, and some tailored specifically to beads (complementary colors, triads, yada yada), but Beverly gives the clearest explanation I've seen anywhere about the importance of saturation and value. The book also comes with color wheels in the back for you to play with.

Another imaginative feature of the book is to show lovely photographs and then how Beverly builds bead soups from them. The montage below illustrates how she assembled her bead soup from the reds and purples of the grapes and the wine, with sprinkles of green and other hues mixed in for interest.


I have tended to stick with monochromatic color schemes because that's what I feel most comfortable with, but this book is giving me the courage to play with other combinations. I think my first step will be to find some pleasing photographs and build bead soups around them. (I know there are lots of color palette generators out there--anyone have a favorite?)

OK, end of the commercial. I also have to confess I am using this book as a rationale for building up my seed bead stash (Oh, this bead soup would be much more complex if I had THREE shades of rose to add, instead of just one...) And the one bit of personal advice I can throw in, based on my sole freeform beadweaving experience, is to make WAY more bead soup than you think you'll need. For my sea monster above, I kept adding to the soup and ran out of beads in several colors before I was finished.

Saturday, July 16, 2011

Some new-ish work

Black Beauty
Somebody remind me again why I decided six months ago that it would be a good idea to (a) launch an online store, (b) start a blog, (c) continue going to graduate school and (d) keep my full-time day job.

I finished several pieces in time for the crafts show last month, but haven't had time to take photos until today.

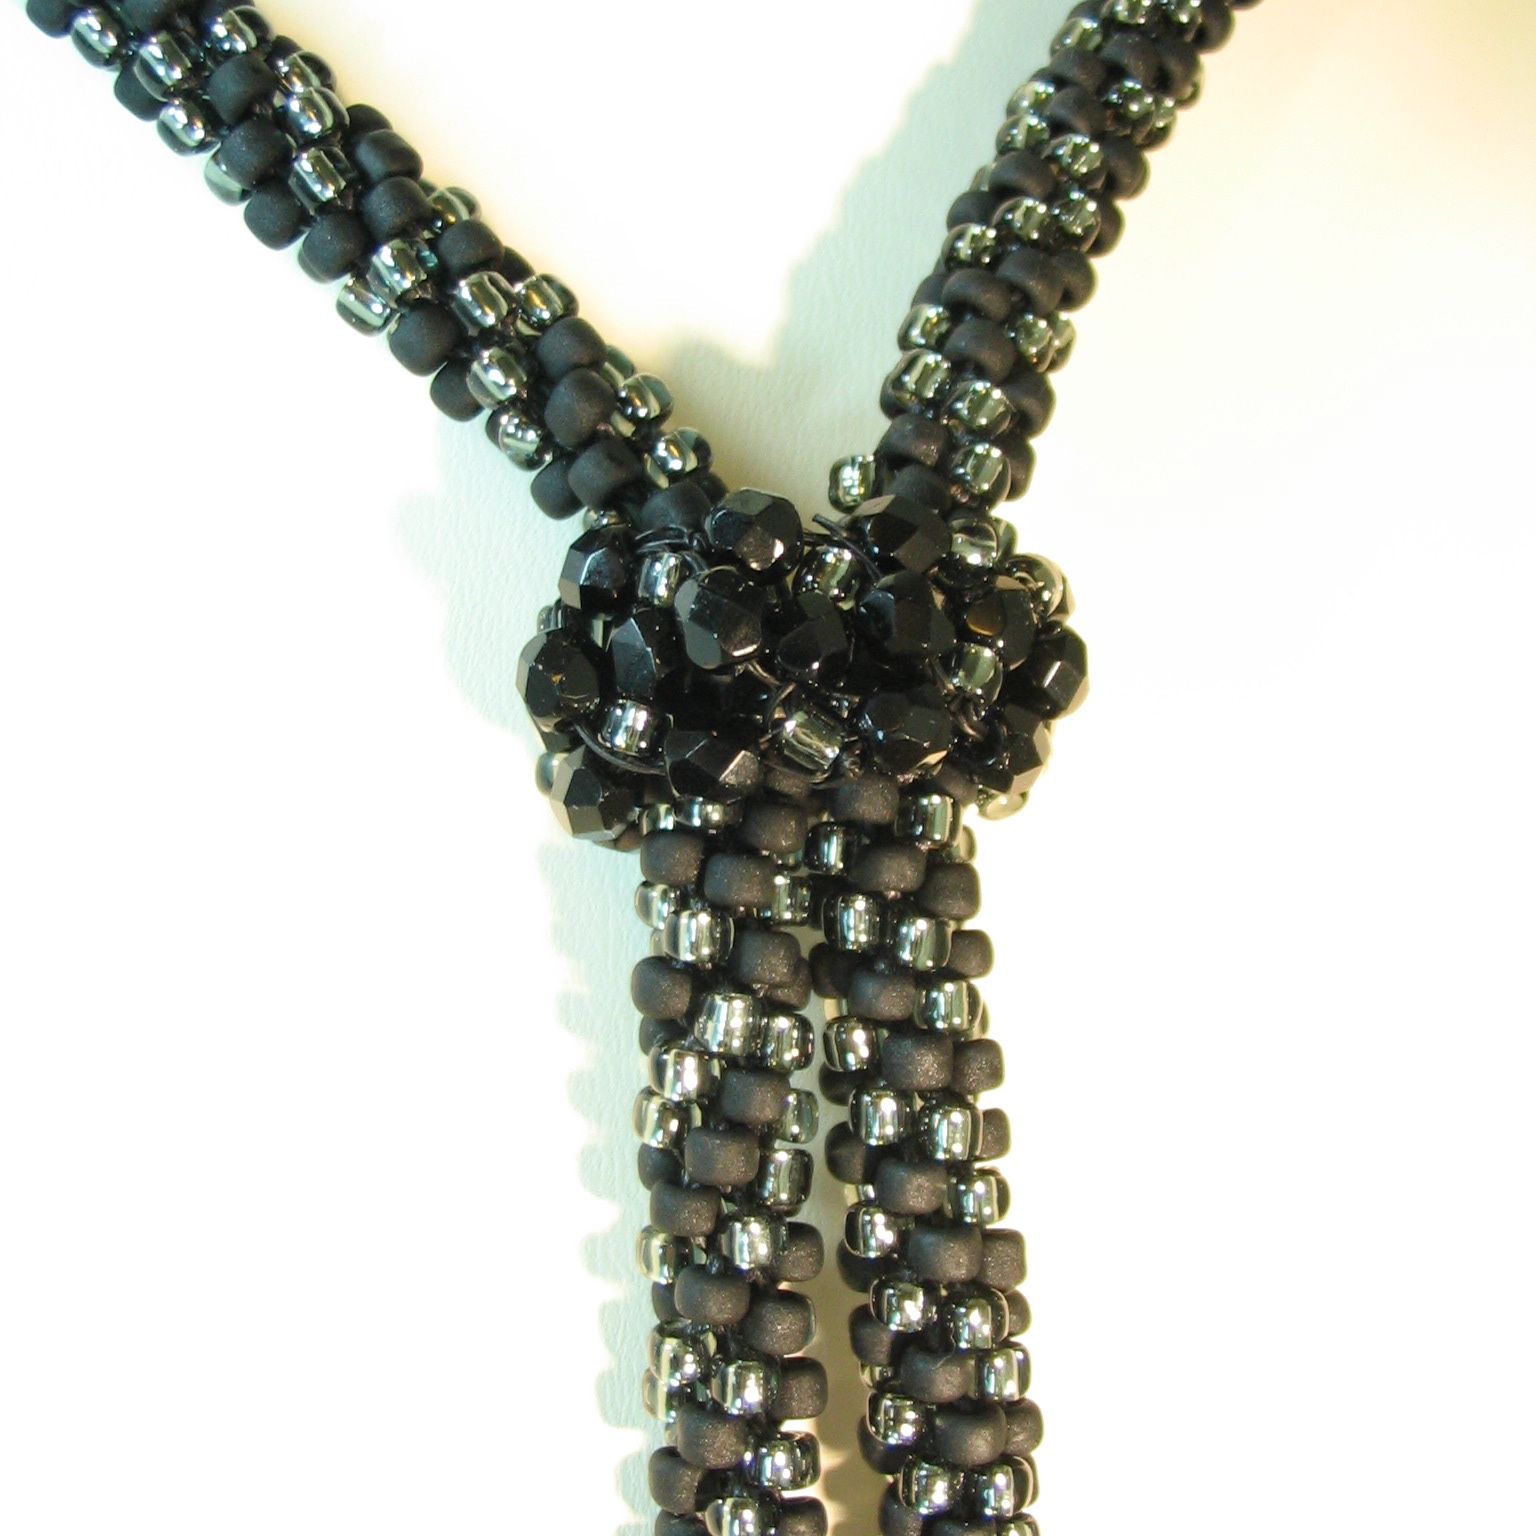
Above is the first beaded rope that I have made entirely on a marudai, not a handheld foam disk thingy. It was inspired by this necklace, which was made on a foam disk thingy. That piece had so many admirers that I knew I wanted to made more versions of it.

The previous necklace, as explained in the April post, was made in two parts. My original plan was to make this new necklace long enough that I could simply tie it into a square knot, lariat-style.

It's plenty long, but the knot proved clunky. So I decided to simply join the necklace by adding a slider made with Czech fire polish in a simple right-angle weave band.

Here are some closeups, but I must say the silver-lined beads are so glittery that they make this piece hard to photograph well:


One of the reasons I wanted to learn to use the marudai is because everyone said braiding went so much faster on the stand than on a foam disk, because you move both hands at once. That's true for textile braids, as I learned in the kumi workshop I took, but when you're making an eight-strand braid and dropping a bead at every turn, it's less so. You can try to move two strands at once, but you have to make sure the beads "catch"--i.e., that they're in the proper position at the point of braiding so that subsequent strands lock them into place. For me, that translated into dropping one of the tama (bobbins) at almost every turn to poke the bead into place with my finger. 

I'm sure I'll get faster with practice. Eventually, I'd love to take a kumi workshop that focuses specifically on beaded braids so that I can make jewelry like the amazing Adrienne Gaskell (which probably means, duh, taking a class from her. I've been eying her touring schedule for months to see if she's coming anywhere near me.)

And here's a non-kumihimo project--a Cellini spiral necklace that I blogged about back in April. It was going to be my donation to a silent auction at my daughter's high school, but it was taking so damn long I was afraid I wouldn't finish in time. 

Golden Glow

At the crafts fair last month, this was the bling on my table that stopped people in their tracks and made them come over to stroke it, squeeze it, study it to see how it was made. (But no one bought it.) 

I made matching earrings using some clever findings from Fire Mountain Gems-- tiny perforated beading disks that fit into post earring findings. They, too, had admirers (including my daughter), but no takers. 

They remind me of fireworks--so much so that I had planned to post a pic of them on the 4th of July. But Hell already has enough roads leading to it that are paved with good intentions, so I'll take a detour.

I've completed some other pieces as well, but these were all I had time to photograph and list in my Artfire shop. (And the next task on my to-do list is to to figure out why my pics look so dark and crappy on ArtFire. They look better on my blog. Are there otherArtFire artists out there who can solve this riddle for me?)

I know that learning to take great photos of jewelry is an art in itself. This blog has already made me a better photographer. (Lesson 1: Turn off the flash. Lesson 2: Find the macro setting on your camera. Lesson 3: Clear your local Target's shelves of daylight-spectrum lightbulbs and commandeer every small lamp in your house when attempting to take photos with no natural light available.) See?

Sunday, July 10, 2011

How do you know your obsession with Swarovski crystals has gone too far?

When you think this is a good idea:


I wish I could tell you that this image has been Photoshopped, but jewel-encrusted contact lenses are a real product--and not even new. I learned about this from a September 2008 Beading Gem blog post . (OK, I'll admit--they are probably are easier to find if you lose one.)

I suppose you could also title this blog entry "how do you know when you have too much money?" 

Can you come up with others?

Sunday, July 3, 2011

The kindness of bloggers

Titiana's Folly by Lisa Sittniewski

The end of June marked six months since I launched this blog. I remember my trepidation setting up the Blogger account and the first few posts--should I use my real name in the bio? How personal should I allow my posts to be? Will creepy people start spamming me? My worries seem so silly now.

Because what I've discovered in my six months as a blogger--and oh, maybe 18 months as a bead blog reader--is what a special community you are.

At left is the bracelet that inspired this post. It may look familiar to readers who blog-hopped their way through the Fairy Tale bead swap organized by Lori Anderson of Pretty Things. Lisa Sittniewski of Alterity made it from the beads I sent her--then mailed it to me as a surprise gift because she knew the button I had included in the bead mix was special to me. I was so touched by the kindness of an artist who didn't even know me a few weeks before.

And that got me to thinking about all the other bloggers who have touched me with their generous spirit and wisdom and guidance. First there is Lori, whose Pretty Things was one of the first bead blogs I stumbled upon well over a year ago. I so felt that I knew her that I sought her out to introduce myself when she participated in a local crafts show. She was as charming and encouraging in person as she was online and invited me to join the bead swap group. That fairy tale challenge was one of the funnest things I've done and exposed me to a whole new community.

Then there is Mortira of Inspirational Beading. I hardly ever comment on her blog (my bad--I'm still trying to move from lurker to participant on the many bead blogs I read and love), so she probably has no idea what a huge influence her blog has been on me. Like Pretty Things, Inspirational Beading was one of the earliest blogs I discovered, and Mortira's beadweaving tutorials are a model of clarity. I love her curated collections as well, not to mention following her bead self-challenges, like the bracelet-a-week one she's on now.

Then there's Mandy of Bead for Brains. I started reading her blog a couple of months ago when the Beading Gem's Journal blogged about her quest to tackle a new bead project every day for a year. At the time--it was probably around day 60 or 80 of her journey--I thought that she and I were on about the same skill level of beading. But she has since lapped me many times over in her fearless pursuit of knowledge. She has generously shared her discoveries--great bead books, online tutorials, marvelous blogs--as well as documenting both her foibles and feats of wonder. Her latest adventures have taken her to Russian and Hungarian sites, where she has conquered beading patterns thanks to her uncanny ability to decipher photos and the often whimsical translations provided by Google Chrome. Thanks to Mandy, I know not to "sweat under the buru"!

There are so many more bloggers and I can't name them all, but I want to give a shout-out to all the wonderful participants in the Kumi2 Yahoo Group for their wonderful guidance as well--Janis and Wheat and Carol and Adrienne are just some of the many kumihimo experts who have shared their knowledge and passion with me and so many others.

So thank you all, you passionate and generous artists who take the time and effort to share with others in the beading blogosphere,
Geneva

Friday, June 17, 2011

Show time!

Q: Geneva, why haven't you been posting lately?
A: Because I've busy cranking out jewelry for the...

Thanks, Patti, for the customization of the sign!

Come on down to downtown Silver Spring this Saturday to sample not only the Fenton Street Market's wares but the Silver Spring Blues Festival, which has expanded to two stages this year. Part of the vendors' proceeds go to support the festival. The market will go until 5 p.m., to overlap with the blues festival.

Saturday, June 4, 2011

Fairy Tale Bead Swap Blog Hop--the Reveal!

Catch of a Lifetime

My computer and/or mouse have been very temperamental this week, so I haven't been able to post the buildup to the reveal that I planned, and I will have to keep this entry short--but I couldn't miss the June 4 deadline for posting what I had done with the beads I had gotten from the lovely Lisa of alterityart .

This was my first time participating in the Bead Soup Party bead swap that is run by Lori of Pretty Things. She pairs up beader-bloggers, who swap beads with each other and then make a piece of jewelry on a designated theme and blog about it. This swap's theme was fairy tales, and Lisa sent me a haunting fable by the Brothers Grimm of a fisherman and his ambitious and greedy wife (who seems to have torn a page from the playbook of Lady Macbeth).

Here are the beads Lisa sent me, an assortment of mostly vintage beads in blues and greens with a few grays thrown in to represent the tempestuous sea, craggy rocks and roiling skies. There were some nubbly textured gold beads and two patina'd beads that suggested sunken treasure and diving bells to me. All of them with lots of character and history. She also included this amazing Vintaj brass fish focal.

This necklace was so much fun to make. It was my first attempt at freeform beadweaving, and I was inspired by Beverly Ash Gilbert's marvelous book Beaded Colorways. In fact, I had planned to write a whole blog entry just raving about this book, which I picked up by chance in my local Borders a couple of weeks ago. That will have to wait until I can get my keyboard working again--I simply can't type on the laptop keyboard and need my ergonomic one, which is flaking out on me.

Anyway, I have Lisa's aquaeous beads swimming around in a sea of seed beads in freeform netting that is meant to suggest waves and seaweed and perhaps a net ensnaring the magic talking fish.

If you'd like to see what Lisa did with the beads I sent her, hop on over to her blog--I'm dying to see myself! [8:30 a.m. update: I wrote the above on Friday and scheduled it to post on Saturday. But it's Saturday morning and I've peeked at Lisa's Titiana's Folly --the gorgeous charm bracelet she made with my "moon pearls," "magic seedpods" and spectra glass.]

And please check out the explosion of creativity from all the talented beaders who participated in the swap. The links are below--start hopping!


Fairy Tale/Spring Bead Swap Blog Hop

Lori Anderson, Pretty Things
Rebecca Anderson, Song Beads
Courtney Breul, Beads By Breul 
Loretta Carstensen, Designs by Loretta
Evelyn Hall, Dragon Lady Evelyn
Sandy Richardson, Sandy's Coloring Box
Tara Plote, Newbie Beader
Christine Brandel, A Hot Piece of Glass
Lisa Sittniewski, Alterity Art
Joanna Matuszczyk, Filcowe
Jenni Connolly, Jenni Bead
Geneva Collins, Torque Story
Elisabeth Auld, Beads For Busy Gals
Sally Russick, Wireworked
Mary McGraw, MK's Creative Musings
Norma Turvey, Moonlit Fantaseas
Erin Prais-Hintz, Treasures Found 
Stephanie Haussler, Pixybug Designs
Shai Williams, Shaia's Ramblings
Johanna Rhodes, Fire Phoenix Creations
Sandi Lee James, Do Be Do Bead Do
Valerie Norton, Hot Fused Glass


Tuesday, May 17, 2011

Next stop, Fenton Street


I learned recently that I've been accepted as a vendor at the Fenton Street Market in downtown Silver Spring. (The market is not, um, located at Fenton Street. Long story there. Check out the site for the explanation.) I'll be selling my jewelry (and, hopefully, demonstrating kumihimo) at the special June 18 market that's being held in conjunction with the Silver Spring Blues Festival.

I'm very excited--this is my first "real" crafts fair. The two others I've done were closed events with people who knew me. But never fear, my awesome friend Patti is going to be selling her gorgeous fused glass jewelry next to me (if our request to be placed together can be honored), and she's a pro!

(Pssst, Patti, get that online storefront up so I can hyperlink your name!)

Time to start cranking out the merch! Oh, and I need to get a tent. And a banner. And real business cards. Oh, and class starts next week. Yikes.

Monday, May 2, 2011

The REAL Kumihimo 101

I am embarrassed that I titled a blogpost a few weeks ago "Kumihimo 101." In it I described a few basics about kumihimo and showed a beaded necklace I was making on a handheld foam disk. This post is the real kumihimo 101, because I just spent the weekend taking a two-day workshop on using a marudai with the fabulous ladies of the Blue Ridge Weavers Guild under the guidance of Rodrick Owen and Terry Flynn.

Rodrick is one of the world's leading authorities on kumihimo. He lives in Britain, so I was lucky that he was teaching a workshop less than an hour and a half away.

I can't remember if I mentioned it in my last post, but I have had a marudai since Christmas. After a year or so of using the disk, I felt ready to graduate to the "real" thing. I tried to teach myself how to use it using a book by Jacqui Carey, but just couldn't get the hang of it. I signed up for a workshop taught by Carol Franklin at the end of January, but it was canceled for lack of enrollment. This April one was the only other one I could find anywhere near me.

I had to get up way early on Saturday to get to Purcellville, Va., by 8:45 a.m. I was very warmly welcomed by workshop organizer Beth and all the other talented women who belong to the guild.

I have to confess I was a real klutz and much slower than the others to grasp how to wind the threads on the warping pegs, how to secure the warp threads to the leader threads on the tama (bobbins), and how to flip and twist the bobbins so that they would spool the thread naturally when set up on the marudai. Terry had the patience of a saint working with me, the non-weaver in the group.

Saturday was devoted to eight-strand braids, with the day broken up with an amazing potluck lunch. On Sunday, we ventured onto 16-strand braids (and another amazing potluck lunch). It was midway through tying on the 16 bobbins that I finally got the hang of it.

Once the setup was out of the way, I think I did all right with the actual braiding. I could follow most of the diagrams that I attempted from the handouts, anyway.

I don't have the greatest pics, but here are a few snapshots of the weekend:

Here's the group as a whole late Saturday, as we were winding down. (No pun intended. Really.)

The other pictures are from Sunday.
In the photo at left, Rodrick is demonstrating something important. (I don't remember what.) Laritza is clearly paying more attention that I am.

Karen, right, is demonstrating that twisty-hand thing you have to do sometimes. It's awkward to start the bobbin transfer, but your hands land right when you're done, which I suppose is better than starting untwisted and finishing twisted. That's Beth next to her, poring over the textbook (Rodrick's Braids book).

When you know what you're doing, kumi is a very serene, Zenlike, rhythmic art. The wooden tama make a gentle clacking sound as you braid, which is soothing in a wind chime-y kind of way. I know I'm going to like doing this.

I think the Blue Ridge guild will post a photo album on the workshop soon--Beth was snapping away both days--on its site soon, so be sure to check it out.

Wednesday, April 27, 2011

Rhapsody in Teal

Here is the finished necklace that I showed in progress on the kumihimo disk two posts ago. I am absolutely ecstatic over how it turned at, as immodest as that sounds. (You like it? If you live in the D.C. area, you can bid on it at the Blair High School silent auction Friday evening.)


It is actually a necklace in two parts. The first part is a spiral rope necklace about 22 inches long. It was woven on the disk using matte-finish size 8 teal beads on six of the threads (C-Lon Bead Cord) and two threads loaded with super-sparkly silver-lined teal beads.

When I started the necklace, I knew I would have to do something to jazz up the simple rope, but I wasn't sure what. I had some freshwater pearls died peacock blue that coordinated with the teal beads beautifully. At first I tried to make a beaded bead using the pearls, but that didn't come out well. I was flipping through my beading books for inspiration and came upon a crocheted rope by Rona Loomis in Creative Beading vol. 3. She had accented her necklace with 7-inch beaded ropes that had various fringe and dangle treatments on the end, and tied the way you see illustrated on my piece. I knew immediately that I wanted to borrow the technique.

Problem No. 1: I wasn't sure if I had enough beads left for another 7 inches of cord. I had plenty of the shiny beads, since the main rope was made up of mostly matte ones. I thought an all-shiny-bead rope would look garish, so I came upon this grandiose idea to change the proportions as I wove the braid. It required a great deal of math and counting, winding and unwinding the bobbins to switch the proportions of beads, measuring every inch, and more than a little angst as to whether I would have enough matte beads, but I wove it so that the first inch on both ends was all shiny beads, followed by another inch of half shiny, half matte, then the middle three inches was the same ratio as the main necklace--three parts matte and one part shiny.

It was a cool hombre effect, but frankly, I don't know that you'd ever notice it unless you stuck your nose right up to it. (Here, go ahead. Stick your nose right up to it:


Problem No. 2: how to embellish the ends? I envisioned using those peacock beads that didn't get turned into a beaded bead. I knew that pearls have tiny holes, so before I began weaving, I made sure that the C-Lon cord would fit through the bead holes. Hah! This is where I outsmarted myself. When I finished the seed bead part and tried to string on the pearls, they wouldn't fit. I had stiffened the cord ends with Fray-chek to string on the seed beads, but the pearls just wouldn't go. I struggled for more than an hour and managed to get only about three pearls on. Forcing the cord through the holes caused it to lose all its stiffness, so I would have had to re-dip every cord in Fray-Chek and let it dry after every bead.

Time for a plan B. I rummaged through my supplies. Luckily, teal and aqua are among my favorite colors, so I had options. I found these glass chips that coordinated nicely. I was a little afraid that they might make the fringe too heavy, but they don't at all. Success!

I also used glass chips to make coordinating post earrings: I like their simplicity.

(Ironically, I wound up having matte beads left over. I had been reluctant to use them all up in the braid because I figured I'd need some to stitch up into tubes for earrings.)

So yes, it was hours and hours of work for a necklace I'm giving away, but I hope its eventual owner will feel the good karma it's imbued with--it was a happy process to make it, and I'm happy to show it off as an example of my best work.

Sunday, April 24, 2011

My new favorite color ...

... is Longhorn orange. Time to go shopping for a mug that says, "my daughter and my dollars go to Texas."

Tuesday, April 19, 2011

Kumihimo 101

My last post showed off the beginnings of a tubular peyote-stitched gold beaded necklace that I said would be for my daughter's high school's silent auction. After stitching a few more inches on it, I realized it would take forever to make the long rope I had imagined, so I set it aside for something that would materialize a bit faster. Behold my kumihimo-beaded rope.


For those not familiar with kumihimo (which is just about everybody, duh), it is an ancient Japanese braiding technique traditionally done on a wooden stand called a marudai. However, several years back, an ingenious Japanese artist (I can't recall her name, and I'm too tired to Google it), invented a handheld loom made of foam. That is what I'm holding in the photo. Kumihimo is normally used to make textile braids, but when you add beads to the thread or cord and drop a bead at every pass, it creates a beautifully textured beaded rope that looks a lot like beaded crochet.

Although it takes forever to load the beads onto the eight strands (I'm using size 8 beads in two finishes of teal; the stringing medium is C-lon cord), the braiding goes relatively fast--a lot faster than the peyote stitching, anyway. (Thanks to Adrienne Gaskell for giving me the tip to stiffen the beading cord using Fray-check. This allows you to thread beads onto thick cord without a needle. If you use a needle, you have to use much thinner cord in order for it to fit through the beads doubled up).

If you want to learn more, check out the works of Jacqui Carey and Rodrick Owen, whom I believe are considered the foremost authorities writing in English on the subject. However, I want to give a shout-out to a series of posts on the Stone Heart Beads blog I discovered that led me to want to learn more about this fascinating but obscure art. The four-part series led me to the book Braiding for Beaders by Anne Dilker of Moss Hollow Pottery. There is also a Yahoo group devoted to kumi.

Monday, April 11, 2011

Pretty in Purply Pink

My little fingers cannot weave beads fast enough to post a new finished work every week, so I'm going to have post some filler here, to feed the relentless maw that is the blog.

I never did show off my bounty from the Virginia craftsmen's show, so I'll do that here.

Everything except the old-man pin is from Lori Anderson of Pretty Things. I bought the lovely purple and pink lampwork-beaded necklace (which I have worn twice already) and the larimar earrings at the fair itself. The peachy-pink nautilus earrings I ordered from her a week later, after I realized I was still pining for them (she ships fast, too!). The pin is carved wood and I bought it from a craftsman named Tom Vosler. Although I will wear it as a pin, I was thinking mainly of using it as a funky backdrop for jewelry photographs. (I swear it looks like my first college creative writing professor, although I didn't think of that until I took the photos yesterday.)

And here is a WIP. It is destined to be a necklace that is destined to be my donation to the Blair High School silent auction at the end of April. I love how it is turning out, but man oh man, working with these teeny size 11 beads means it is taking forever. On my other peyote spiral necklaces, I could weave about an inch an hour. But I've put more than five hours into this baby, and it is barely four inches long. (I added about an inch more after taking this photo yesterday afternoon.)

Sunday, April 3, 2011

Back to the beads


My last several posts have veered off topic from what this blog is supposed to be about, so I'll post a couple of pics of two necklaces I talked about earlier as they were in progress. 

This one I call "Russian Gold" because it features the Russian spiral stitch. I like how the long rope is broken up by the large glass rondelles on either side. Note that neither of the two spiral rope columns pictured in my original post here were used to make this; I made three new ones that were all the same thickness. (And no, I never solved the mystery of why try #1 was fat and try #2 was skinny.) 


And lookie here at the necklace I first blogged about way back in January

I called it "Down and Dirty" at the time because that was the week's theme in the Year of Jewelry Project and earth tones were my inspiration. I actually finished the necklace within a week or so of that blogpost, but it took me several more weeks to get around to taking decent pictures of it. By then, the YOJP's theme was "Windswept," so that's what I called it when I posted a pic there. (I wrote that it evoked the swirling maelstrom that autumn leaves sometimes get caught up in.)

This was my first time doing double spiral rope stitch. I had seen the stitch before in several beadweaving books, and although it looked very easy, I was never tempted to make anything with it because I didn't like the finished effect. However, this design, by Alicia Shems (in the book Creative Beading vol. 5), features these ingenious graduated loops. I think the effect is stunning. If I remember correctly, I altered the pattern only slightly, using somewhat larger beads and longer loops. Check out Alicia Shems' amazing work at the link above!

I think I said in my last post that I would show off some of my bounty from the craftsmen's fair, but I haven't been able to take pictures of that, either. Yesterday morning I was shooting some pics of jewelry when my camera batteries died. I got some new batteries later in the day, but today I had to disassemble my light box to reorganize my space. I'm trying to establish a permanent setup so that I can take pictures day or night using appropriate artificial light (lamps outfitted with daylight spectrum bulbs.). Right now, I'm limited to shooting on Saturday and Sunday mornings and hoping that it's not a cloudy day.

I was hoping that restoring my lightbox setup would be my this-weekend project, but it may be turning into my next-weekend project.

Monday, March 28, 2011

Shopping trip!

I finally checked out the Craftsmen's Classic Arts & Crafts Show in Chantilly, Va., on Saturday. I've seen these advertised in the papers for years, but the Dulles Expo Center always seemed so far away. (Discloser: Everything in Virginia seems far away when you live in Maryland, even if you are traveling from a near-in suburb of D.C. to another near-in suburb of D.C., and it really only takes about 30 minutes to get there. Chantilly was a little over an hour's drive.)

I had read on Lori Anderson's blog Pretty Things that she would be selling there. She is the creator of the famous (among beaders, anyway) Bead Soup Blog Party. I have been reading her awesome blog for months and find it very inspirational. I have learned a lot from it about designing jewelry and doing booth shows from reading her blog, but probably the most important lesson I'm learning is how to create a delightfully charming and engaging blog presence. I felt that I knew her before I met her (in fact, I was a little worried about coming off as a stalker). I can assure you she is as gracious and kind in person as you would expect from reading her blog.

I think I embarrassed my daughter only a little by making her take this pic with my iPhone:

Unfortunately, my snaps of Lori at her booth came out way too dark, so I cannot show off her lovely merchandise. (But check out her most recent post, and you can see her display for yourself.)

I bought a hand-blown glass bead necklace and larimer earrings from her but haven't had time to take pics.


I also bought a hand-carved wooden brooch from this guy here, after my daughter came back showing off a necklace she had bought from him. I'm afraid he'll have to go nameless, since I didn't record either his name or the name of his company. So he'll be forever preserved as the Hand-Carved-Knife-Handle-and-Assorted-Odd-Tschotkes guy.

Saturday, March 26, 2011

Meet full need


One of the advantages of having a blog that virtually no one reads is that you can write a post purely for the purpose of making a couple of friends do a spit-take! Above is a talented actor named Mark Jude Sullivan, who played Lord Byron in last night's staged reading of Camino Real. The event was part of Georgetown University's fantastic Tennessee Williams Centennial Festival. The fest runs through Sunday, with a John Waters show as the finale, I think. In addition to seeing this production, I also caught a fascinating conversation with Edward Albee the night before. (Did you know that the stars of the film version of Who's Afraid of Virginia Woolf were originally going to be Bette Davis and James Mason?)

Thursday, March 24, 2011

Field trip!


Last night my digital media class went to Google's Washington headquarters for a presentation by Peter Greenberger, one of the company's communications people. I am learning so much in that class. In fact I am flexing my nascent social media muscles by attempting to post on my blog remotely from my iPhone while I wait for a shuttle back to the office.

If you're reading this, it means I succeeded!

Tuesday, March 22, 2011

Never say never


We used to have the loveliest ornamental tree in our front yard. Someone told me once that she thought it was a species of blooming magnolia, but I never really knew for sure. It was a favorite climbing tree for our daughter and other neighborhood kids, because it was very Y-shaped, with these two strong branches coming off a short, stout trunk. Its blooms were a lovely harbinger of spring, arriving even before the cherry blossoms.

About six or seven years ago, it severed in two after a bad storm, and we paid to have it chopped up and toted away. But every year, a feisty little sprout shoots up from the flush stump and offers up a few blossoms. 

This year, I think it may have graduated to "shrub" status. Let's hear it for hanging in there!

Sunday, March 20, 2011

Macaroni groggers

I had a blast at the IFFP Purim festival today. I sold my jewelry at a crafts table there, and had contributed a  pearl necklace and earrings set to the silent auction (see previous post).

"Macaroni groggers" refers to the boxes of pasta that people were asked to bring and shake. It is a tradition during Purim festivals to shake groggers, rattles and any other kind of noisemakers whenever the name "Haman"is said during the reading of the story of Esther. Once the pasta boxes had done their duty as noisemakers, they were collected for donation to a local soup kitchen.

The favorite part of my morning was meeting a young artist named Sarah, who was about 11 or 12, I think. She told me that she made jewelry and that her grandmother had taught her how. She also said she loved to paint. She chatted with me all during my setting up, admired several of my designs and bought a pair of iridescent blue teardrop earrings from me--my first sale of the day. Thanks, Sarah!

Tuesday, March 15, 2011

Do you like this necklace?


Well, it can be yours if you attend the IFFP Purim festival and silent auction in Silver Spring, Md., this Sunday. Five braided strands of bronze and cream freshwater pearls, interspersed with glass "pearls" and gold-plated spacer beads, the choker is my donation to this wonderful group and cause.


(I threw in matching earrings, too.)


Friday, March 11, 2011

Mistakes were made


I've been trying to crank out some pieces for a crafts fair I'll be participating in on March 20. It's for the Interfaith Families Project Purim Festival. I was an active member of IFFP for many years--it's a wonderful group for Christian-Jewish intermarried families. In addition to the crafts fair part--which I gather is pretty small (they tried this for the first time last year, and I think it was limited to a couple of teens selling jewelry)--there is a silent auction. I spent today making a necklace and earrings for the silent auction--I'll post a pic here when I can take some better shots.

The photo above is for a piece that's still in progress. I wanted to make a Russian spiral rope necklace. Instead of making one long rope, however, I envisioned making it in three segments, with some large beads interspersed in the breaks. I did one 7-inch segment, the one on the left, on Monday or Tuesday. The following evening, I started segment two, but for some reason it came out a lot skinner. I took it apart several times, but it still stayed skinny. I assumed that I had messed up on the set-up row. I finally gave up, and the following evening I started a new segment, taking extra care with the setup. It, too, came out skinny. Then I did two more, both skinny. I can't figure out why the first one is so much fatter than the others. I can only assume that I somehow added a bead after the set-up row, and I can't replicate my mistake. Either that, or it's simply a matter of tension. I know that with many tubular stitches, the first inch or so is always loose, but I can't account for this. I will save the fat one for another project and use the three skinny ones for my current design.

Sunday, March 6, 2011

Frost on the Lilacs

My last post was about honeysuckle. This one will be about lilacs. It sounds like I'm pining for high summer. I finished a new necklace this morning: I had spring on my mind when dreaming up the color combination, so it is filled with soft hues of lilac, dusty pink and shimmery silver.

I spent last week making the three Cellini* beads that are the focus of the necklace. They are the kind of thing you can do while watching TV, as long as you're not watching anything with subtitles. I had experimented with making these beaded beads before, but could never figure out how to make them hang right on a necklace. Even if you do several decreases at both ends, you will still wind up with a fairly substantial hole, and the bead dangles off-center from the stringing wire.

I came up with what I thought was an ingenious solution: I had some rubber tubing that I snipped off to a length slightly shorter than each beaded bead, and I glued a bead cord end (the kind of thing you might put on the end of a braid; it has a hole in the center) on each end of the tubing segment. Let's call this segment a "tubette." Then I stuffed the tubette into each Cellini bead and threaded them onto the beading wire with the other beads. The wire was now perfectly centered inside the bead, and the tubette was not visible at all.

When I was making the beads, I envisioned combining them with some large clear crystal rounds and pearls. But when I was rummaging through my supplies, I didn't have the large white-white pearls I envisioned. I tried making the necklace with the Cellini beads and some 18 mm crystal rounds alone. The necklace looked gorgeous, but it was so heavy I though someone might shy away from buying it. I mixed in some silver-painted wooden beads I had. The crystals/painted beads pairing didn't work, so out came the crystals altogether. The final touch was to add two lampworked beads (from Fire Mountain Gems) of a dusty pink with purple swirls to the combination.

There was one last bit of ingenuity required. I had planned to put decorative bead caps on each end of the Cellini beads, to finish them off nicely and hide the tubettes inside completely. I have a fair number of bead caps of various designs, but all were too small. I found some domed filigree bead caps made for a, say, 8-10 mm bead. I thought, what the heck, these don't cost much, so if I ruin one experimenting, who cares? I took a pair of pliers and gently started flattening it, working round and round the bead cap. Within a few minutes, voila! I had a perfectly flat disk that looked like a daisy and fit the end of the Cellini beads perfectly.

I call the necklace Frost on the Lilacs because of the pale purple and silver combo, although I suspect getting actual frost on actual lilacs would require rather freakish weather conditions.

Here's a closeup of the Cellini bead and one of the lampworked ones. In real life, it does not look this grape-y; it really is a soft lilac. But it's a dismal rainy day here and I couldn't get good natural lighting. You can just make out the flattened disks on each end--can you believe they started out semispherical?

*Cellini bead--a bead made from a peyote stitch called Cellini spiral. 
The pattern uses beads of graduated sizes in a way that causes an undulating, 
thick-and-thin spiral. Mine uses five kinds of beads, from size 11 to size 6.

I had two more of the pink lampworked beads after using two in this, so I made simple matching earrings with them.  My apologies that this pic is a little blurry.

Monday, February 21, 2011

Honeysuckle huh?

I finished the "Down and Dirty" necklace a few weeks ago--in time for the YOJP deadline even--but I haven't had time to take good photos of it, so that will have to wait. So I'll post about something else today, something that's been puzzling me for weeks.

Every year, Pantone releases its color forecast of what shades will be hot--in clothes, decor, even cars. The 2011 color of the year is this:


Now I think this is a perfectly lovely color. I love pink, especially deep rosy shades like this. What I object to is the name. Honeysuckle? I grew up in a place where honeysuckle grew wild and rampant in alleys, covering backyard fences and suffocating backwoods lots. As kids, we would pluck the ripe blossoms, pull out the stamen (or pistil or whatever it's called) and catch the drop of nectar that gives the plant its name on our tongues.

Even in the Washington suburbs I have some honeysuckle growing in the divide between my front yard and my neighbors'. But to me, honeysuckle looks like this:


Do you see any pink there?

Obviously, some pink cultivars do exist--they come up on Google image searches--but I've never seen one in real life. IMHO [does it date me to use that abbreviation?], calling Pantone shade No. 18-2120 "honeysuckle" is like saying catchup is green, just because such a thing exists.