Monday, May 28, 2012

Gone fishin'


I'm away on vacation (no, not really fishing, and not to Bead & Button, like everyone else in the beading stratosphere--I'm visiting relatives out West with my daughter), so there's no I Might Make That! Monday today.

I'll resume next week. Enjoy your Memorial Day and happy start of summer, everyone!


Monday, May 21, 2012

RAW-bezeled chatons for I Might Make That! Monday

Fusion Beads' Red Baubles

A short but sweet post this week--found these cute bezeled earrings as a project on Fusion Beads' website recently. What makes them different is that the bezel is right-angle weave, not brick or peyote stitch, which you see a lot more often. Another difference is that the centers are 8 mm chatons, not rivolis.

Link to the step-by-step tute, which has pretty detailed illustrations. The tute can also be downloaded as a PDF.

Bowdabra's Formal Necklace
I'll throw in one more pattern that came my way via Craft Gossip. It's from a site called Bowdabra, which sells gizmos for making bows.

Yes, it looks like lots of other multistrand necklaces, but what makes this one different is it uses a product I've never heard of, Ribbon to Bead. This is a spool of ribbon that has wire on the ends specifically designed for stringing it through beads (with 2 mm or larger holes). And no, I don't think you need to purchase the mini-bowdabra to make the ribbon flourish. It looks like some silly infomercial product.

Has anybody ever tried Ribbon to Bead or seen it sold anywhere?

Monday, May 14, 2012

Girly beaded spiders and more for I Might Make That! Monday

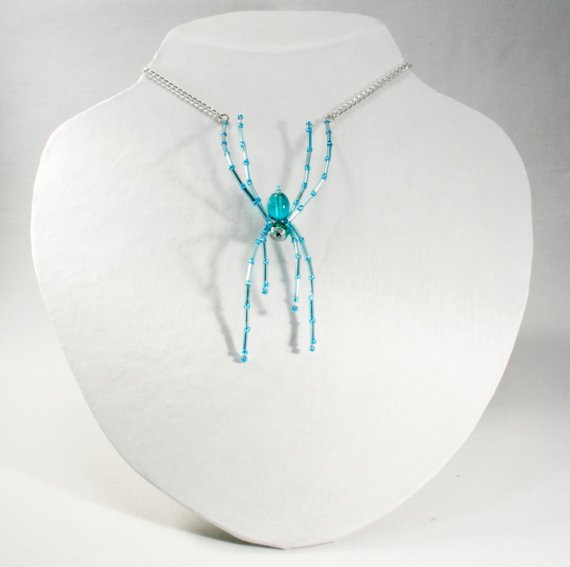
Beaded spider from Shawkl
Arachnaphobes, stay away!

Last October, I spotted a pattern for a beaded spider--I think it was on CraftGossip. I didn't save the link, but in Web-surfing this weekend I stumbled across the creator of those beaded spiders and the tutorial that accompanies them.

Beaded spider from Shawkl
These beauties are from Kathy Shaw of Shawkl. What I like about them in that they're girly, not Goth. Not the least bit  Halloween-y. Just a nice alternative to the dragonflies and butterflies you see everywhere. Kathy Shaw's tute is here and is linked to caption of the rose-colored spider, below, as well.
Beaded spider from Shawkl

These appear to be freestanding spiders, to be used as ornaments or whatnot, but you could easily wire a pinback to them. She has other tutes on her site, too (mostly sewing/quilting/embroidery), which is how I landed on her page to begin with.

Cabbage rose from Shawkl
Check out this darling cabbage rose, for example. I won't tell you what it's made from. Click here to see. I think a cute mixed-media necklace could be made by sewing a dozen, each cupped by a bead cap at the base, onto ribbon or kumi braid, along with lots of pearl and crystal dangles.

Here are some other beady spiders for inspiration:

This green fellow here is from So Crafty; there are instructions for a couple of different variations, plus a video. I like the unbeaded legs effect:

So Crafty spider

And from Etsy (it's sold; I wonder if the buyer wore it as a bride?):

Bridal Spider from Souldier

This one here is getting pretty meta: a beaded spider in which one of the beads is a beaded bead. Whoa.
Meadow Treasures via Alibaba.com

Here's a netted ornament that is inspired by "the legend of the Christmas Spider." Hmmm. Not familiar with that legend. But it does explain why so many of the spiders I'm finding are ornaments, not jewelry. Excuse me while I Google.


OK, I'm back. For those as ignorant as me, a version of the Christmas Spider legend can be found here.

And here's a steampunk bad girl spotted on Pinterest. L-O-V-E this one.


OMG, the Pinterest search for "beaded spiders" turned up some amazing beaded spider webs. I'll post a couple, but then I really have to stop. Really.


Source: ehow.com via Liz on Pinterest


(For blog newcomers, the I Might Make That! Monday Archive can be accessed by clicking the IMMT!M link in the top right corner.)

Saturday, May 12, 2012

Follow the path

Photobucket
Follow the Path

Just treated myself to an e-book--Lori Anderson's wonderful Follow Your Path: Ideas and Inspiration for the Creative Blogger. She's having a sale this weekend in which you can get $1 off.

Of course the writing and creative wisdom are amazing. Her regular readers would expect no less. But the photos are capital-letter AMAZING. It's truly a feast for the eyes.

Lori's blog was one of the first I started reading when I got into jewelry-making. I met her at a crafts show a year or so back, and she is as warm and generous in person as she is in her blog. She, very kindly, became one of my first "followers."

For procrastinators out there, it'd make a great Mother's Day gift--it's instantly downloadable!


Monday, May 7, 2012

Asian knot tutorials for I Might Make That! Monday

Whoops, Monday's arrival caught me off-guard. I didn't have an IMMT!M post ready and the weekend got eaten up with other commitments. But luckily in my inbox today was Fire Mountain Gems' e-newsletter and some great tutorials on Asian knots using these plastic gizmos.

Fire Mountain Gems Asian Knot Tutorials
 
Click on the link in the caption to go to the page. The step-by-step pics are great!


Thursday, May 3, 2012

Red and brown and peacocks!

A while back, I signed up to get emails from Artbeads, although I have never actually ordered from them. A few days ago they featured this red and brown bead mix in one of their promotions. Isn't this yummy? I didn't know I liked red and brown together until I saw this! Now I want to make a multistrand choker kind of like this one but in cherry and chocolate.

Red and brown Swarovski palette from Artbeads.com

Also in my inbox this week was this lovely peacock collection on Artfire. Since I recently wrote about my love for peacock hues, I just had to share. (Click on the caption to go to the live page, if any of these items catch your fancy. This is a screenshot, not a live-linked treasury.)

Peacock Strut Artfire collection

Monday, April 30, 2012

Dutch spiral and a mystery solved for I Might Make That! Monday

Well I'm still cranking out that class assignment, but I didn't want to miss another I Might Make That! Monday, so here, quickly, are a few patterns I've spotted 'round the Web lately that have struck my fancy.

My original plan was to find a tute on Dutch spiral to share, because it's a stitch I think that has a cool effect and I've been meaning to try it. However, I only had a few minutes to surf the Web, and didn't come up with anything I immediately liked that also came with instructions. So I'll share some links to tutes, and I'll share some images I pulled off the Web, but they don't go together.

A basic Dutch spiral tutorial can be found on About. com and a variation of it at the Beading Banshee (I don't mean to be critical of this second design, it's just that the photograph isn't well lit, so it's hard to see the pattern in these dark beads.)

Dutch spiral necklace from the Bead Society of Cape Cod
And here's a lovely example of Dutch spiral that I found on the blog for the Bead Society of Cap Cod. The group apparently featured this stitch in its March meeting.

The necklace below uses Dutch spiral as a gigantic beaded focal, strung on cord. I found it at Shibori Girl, and it's featured there in several colorways. She got the original as a kit (unfortunately, she doesn't list the source), and then made several others from her own beads.
Dutch spiral necklace from Shibori Girl


And since I promised a double edition of IMMT!M last week, I'll throw in this pattern, featured recently on Beads Magic. It's called Bilberry; I didn't see a designer listed. It's simple but elegant.

Bilberry from Beads Magic

But wait, there's more! A few weeks back I featured this mystery pattern, below, and asked if anyone could identify it. Well, it took a few weeks, but the lovely Pam has unearthed the source. Since she added her comment a few weeks after the I published the post, I thought readers might not have seen it.

Her eagle eyes discerned that this was made with beading wire, not wire wire. That sent her to the Softflex website, where she found the instructions here. Thanks, Pam!

(Although I doubt that I will be making this with the 24K beading wire that is recommended--it sells for $36 for 30 feet. )


Softflex necklace

Monday, April 23, 2012

No "I Might Make That! Monday" today--I'm on deadline

The above image came up when I Googled "ink-stained wretch."

I'm cranking out my team's final digital communications plan for my master's class. I promise a double feature when I resume blogging next week.

Thursday, April 19, 2012

An ostentation of peacocks


Source: piccsy.com via Geneva on Pinterest


A flock of peacocks is called an "ostentation," "party" or muster, depending on which Google hit you believe.

I love all shades of blue, but I really think peacock blue is my favorite hue these days. I began collecting peacocks recently on Pinterest. At first I was collecting only beadwork, but I branched out to purses, scarves and other works of art and craft.

These shoes, for example. I couldn't even stand up on those spindly heels, much less walk in them. But a girl can dream, can't she?


Apparently lots of others are fascinated by peacocks, too. Many Pinterestesses (I just made that word up!) have boards devoted to them.

When I was my 20s, I was hugely into Flannery O'Connor (into that Southern Gothic thang, y'all), and one thing I remember about her is that she raised peacocks for a living. That is the sum total of my knowledge of the actual birds.

But this is a jewelry blog, so let's show off some beady peacock bling.


Source: etsy.com via Geneva on Pinterest


Source: etsy.com via Geneva on Pinterest


Monday, April 16, 2012

Dyed pearls from Martha for I Might Make That! Monday

Dyed pearl and ribbon necklace
from Martha Stewart
Martha Stewart certainly doesn't need any promotional help from me, but this tute is old enough that I thought it might be new to readers.

At this link, which dates back to March 2008,  Martha shows how to use plain ol' Rit dye to custom-color glass pearls. It looks easy-peasy, and there is a video as well as written instructions.

I think it would be cool to make a lot of pearls with varying saturations of color for a monochromatic color palette--just by simply leaving them in the bowl of dye for longer and longer intervals.

There are separate instructions for threading the dyed pearls onto the ribbon. Lots of people have done this, but I like the twisted effect of hers. I also adore the richness of her chocolate version, above, and how the pearls have been dyed to match the ribbon perfectly.

I do love pearls, both freshwater and fake.
Crocheted ribbon earrings

And here's a bonus tute for crocheters (unfortunately, I am not): crocheted ribbon and pearl earrings. Wouldn't they be cute to pair with the ribbon necklace? They are from Valerie for Mommy Tyme Gifts and showed up on FaveCrafts.

P.S. I've noticed I've gotten a few new followers recently. Welcome! If you're new to this weekly feature, an archive of past I Might Make That! entries can be found at the link in the top right-hand corner.

Monday, April 9, 2012

Color your own brooch for I Might Make That! Monday


This one's similar to my nail polish patina post from a few Mondays back--not so much a jewelry tute as a technique I'd never think of trying. I originally spotted this on Pinterest, and the original source is the blog Cupcakes and Cashmere.

In this January post, Emily demonstrates how she used nail polish to jazz up a flea market find. I  think it's a clever way to give life to a piece with discolored or unattractive glass.

Source: lovemaegan.com via Geneva on Pinterest

On a somewhat related note, the stylish Maegen of ...Love, Maegan has some clever riffs on upcycling brooches 10 ways. I used to follow her blog all the time but somehow lost the link and forgot all about it. But Pearl of The Beading Gem's Journal featured her bejeweled shirt collars recently and that reminded me of the existence of her blog.

I do love the clever things artists are doing with brooches these days. I do not have any use whatsoever for a brooch bouquet, but I think they are lovely and original. Here are some Pinterest finds.

The first one links to a tute. The ones that follow are just for admiration and inspiration.


Source: fancypantsweddings.com via Kim on Pinterest


Source: etsy.com via Katie on Pinterest


Source: etsy.com via Jennifer on Pinterest

Thursday, April 5, 2012

Dancing with color


Source: google.com via Sally on Pinterest


Isn't this an absolutely awesome color wheel? Sally of Wild Sally Road pinned in to one of her Pinterest Boards recently.

And this vid isn't remotely about jewelry-making, but it's a great partner to the above. I love watching these two tango their way through the color wheel.

Monday, April 2, 2012

Mystery bead and wirework necklace for I Might Make That! Monday


Well, this post will be a tad different from my usual Monday offerings. As I mentioned back in December when I first started this weekly feature,  I wanted I Might Make That! Monday to be my personal to-do list of bead and jewelry projects.

I have all kinds of bead necklace designs and tutes saved on my hard drive, but it's never easy to find things. Take the necklace above. I know that I downloaded this pic at least two years ago, because it was in a folder marked "Jewelry files from Dell" and I retired my PC and went Mac in 2010. The photo was labeled "free project_15" but the image has become detached from the instructions, which I can't seem to find.

Since many of you subscribe to the same e-newsletters and surf the same sites that I do, does anyone recognize this lovely necklace? I offer it here, tutorial-less, because I think you might be able to figure out how to make it without instructions.

I just love the proportions of it--the way the loops frame the cylinder beads, the way the double tiers provide substance. I'd love to give credit to the artist.

(For first-time visitors, the archive of past IMMT!M posts can be reached via the link in the top right corner of my blog.)

Saturday, March 31, 2012

Oh yes and I bead, too

Its been months since I posted pics of anything I created. Truth is, with work and school demands and my beading space still in "mid-transformation" (that's my euphemism for the chaos), I haven't had much time to make jewelry.

I may get started on my Artfire bead swap project this evening--maybe while watching the NCAA finals. (That probably makes me sound like more of a hoops fan than I really am, but my bracket is still in the running in my office's pool. I won last year and bought my crafts show tent with the winnings!)

Anyway, I did make this necklace and earring set and donated it to the silent auction at the Interfaith Family Project's Purim festival in early March.

Last year, in addition to donating something to the auction, I also had a little table set up to sell things and did quite well. But I wasn't up to it this year--I haven't had the chance to beef up my inventory since I sold almost every major piece I had at my office's Christmas crafts show (nice problem to have, right?)

Tuesday, March 27, 2012

Bead room makeover, part 2: the purge


OK, way back in February I told everyone in this space that I was reorganizing my office/bead studio. I was certain that committing to blogging about it would keep me on track and finish the task in a couple of weeks. But never underestimate the tenacity of a procrastinator! (See: illustration.)


Last month, if you recall, I blogged about the planning stage. After lots of measuring and sketching out plans on paper, I ordered some Elfa components from the Container Store's annual sale. But before they came, I had to make room for them.

This is the part that took the longest, and I think it's the step that kept me putting off the room overhaul for so long. (See: illustration.) You see, before I could put in the new Elfa drawer unit, I had to get rid of one floor-to-ceiling bookcase and move the second one to another corner of the room.

Before I could move the bookcase that was staying to its new location, I had to get rid of the four-drawer file cabinet that was in the corner.

Before I could get rid of the file cabinet, I had to clear out all of its contents. Do you see the pattern emerging?

Step No. 1: Clearing off the bookcases. Purging the books was easy--I have been destashing them and sending them off to the local library's used book store for months. A free-for-the-taking notice on the neighborhood listserve found a new home for the bookcase I didn't want anymore. The beading supplies that had been haphazardly heaped on bookshelves got haphazardly heaped somewhere else for a while.

But oh, that filing cabinet. Step No. 2: Confronting two decades' worth of "I'll deal with that later."

During my long freelancing career, I had been very conscientious about about keeping my story files organized--and most of those had been moved to overflow storage in the attic--but everything else was a mess. There were bank statements and pay stubs older than my college daughter. Warranties for products that had been junked years ago. Recipes and household hints and all kinds of stuff clipped before the age of the Internet.

Source: etsy.com via Vanessa on Pinterest

In all, I threw six or seven grocery bags of paper into the recycling bin and filled a couple of other large plastic bags with other trash. I certainly felt lighter throwing it all away. Thanks to Mandy of Beads for Brains, I have begun following the blog Clutter Busting and drawing inspiration from it. (More inspiration that action, however. See: illustration.)

I don't consider myself a packrat, because to me, a packrat is someone who hangs on to stuff because "I might need this later." I knew this stuff had to go--it's just that over the years I'd never taken time to go through it all and jettison it. (Please tell me I am not alone. See: illustration.)

What I thought would be a one- or two-day task sucked up all of two weekends. But finally I had some empty floor space in my room to assemble the first of the two Elfa units I had "designed" for myself. I'll blog about those in part 3, but meanwhile, here are some more design inspirations.

I discovered that my first bead room makeover post got a huge number of page views--in part, I'm sure, because I included design ideas like this one--a dresser with its drawers removed for crafts storage:


Source: sewmanyways.blogspot.com via Anne on Pinterest


The pic below links to a studio conversion that Latrice Murphy of Any Occasion blogged about. She has a video tour too of how she and her husband transformed their garage into a two-person crafts space.


And in a recent Jewelry Making Daily post, Tammy Jones interviews several mixed-media artists about their crafts space and shows off some pics. You can tell that they're real-world spaces, not designed for a home-decor catalog. Here's Kristal Wick's studio:

Don't you just love the vibrant wall color?

Sister's Choice Quilts' crafts studio


Wait, there's more! Craft Gossip's daily e-newsletter recently featured a woodworking shop-to-crafter's paradise transformation that Sister's Choice Quilts underwent. I would kill for this amount of cabinet space.

BTW, I'm noticing a lot of gate-leg tables in my craft room surfing. I'd love to have room for a rocker like she has.

Sister's Choice Quilts' storage wall


And below is, obviously, an add from Michael's that I call this "craft room fiction." This is a staged prop, not a working artist's room.

Still, I'm including it because I briefly thought of using these storage units. My plan was to save up those weekly 40% off one item coupons and amass a storage system piece by piece.


But ultimately I decided that stacking the small units together wouldn't be stable and I didn't want to invest in bolting them to the wall or to one another for security.

And who know that there was a blog devoted to crafty storage?

And yes, I promise that in part 3, I'll post pics of my space.