Showing posts with label beadweaving. Show all posts

Monday, May 20, 2013

Two quickie projects for I Might Make That! Monday

Spikes in Bloom by Kerry Slade
OK, this is going to be a quickie post, since it's already after 11 p.m. and I have to go to bed. But I did not want to miss another IMMT!M.

Here are two fast (I think!) projects that popped up in my Facebook feed recently.

The pic on the left is a beaded component by the wonderful and talented Kerri Slade. The free tute is available from Bead & Button's online website, but you have to be a registered user (also free) to access it. The link is here.

Dreams Do Come True Bracelet at Fusion Beads
If you visit Kerry's Facebook page, you'll see lots of variations of this component made into pendants, earrings, etc. by various beading fans of hers.

The next tute is for this classy pearl and rhinestone bangle. I saw it on Fusion Beads' Facebook page.
It's made with rhinestone cup chain, which I'm dying to try out, combined with wire-wrapped pearls atop a plain bangle.

It is listed as a beginner project, and it certainly does look easy.

Monday, October 8, 2012

Stretch cuff bracelet for I Might Make That! Monday

Stretch Cuff Bracelet from Pretty Quirky Pants

Today does not feel like Monday to me. I had to work on Saturday and got today--Columbus Day--off, so it feels like Sunday instead of the end of a three-day weekend.

Normally I write my posts on Sunday evening, but this installment is coming to you in real time!

I discovered this lovely stretch cuff bracelet on Pinterest. The designer is Pretty Quirky Pants, and if you click on the link, you'll see step-by-step photos and instructions.

I like stretch bracelets because I like a close fit (I spend too much of my time at a keyboard to have something jangling around on my wrist with every keystroke.) The multi-strands of this cuff would give this extra security, I think. Note that these are plain cubes, not two-hole Tilas. The squares provide a nice texture.

I will also provide a tip about stretch bracelets that I haven't tried myself yet but definitely will. I thought it was part of this pattern, but I must have seen it elsewhere in my Pinterest-surfing. Many people complain about the knots on stretch bracelets coming loose, even if you put a dot of glue on them. I have had this happen myself. Last year, I read about using crimp tubes to secure stretch bracelets--i.e., you treat the elastic just like it's beading wire. I did that last year for some bracelets I made for some holiday craft shows, and that seemed to work pretty well.

But that's not the tip I'm passing along. One ingenious artist--and I wish I could credit her--suggested that you knot and crimp. She strings a crimp bead on each strand end, ties a knot, then threads the knot ends that you would usually trim back into the crimps on either side, then crimps them (trimming the extraneous ends at that point). That sounds really secure to me!

Monday, September 17, 2012

Seeing double for I Might Make That! Monday


I promised a double feature last week, so here are two patterns for two-hole Twin beads.

Although these have been on the market for awhile, I have not purchased any yet. But I already know I prefer their rounded, more organic shape to the square Tilas. (I did get a small packet to play with when Preciosa Ornela staged a giveaway, but haven't had a chance to experiment. There were enough beads to make a focal, but not a full bracelet.)

But I have been collecting Twin patterns. To the left is one for a bracelet featured on the Preciosa Ornela website.

Click this link for a downloadable PDF of it.

During the Olympics, the company also published the pattern at right. I'm not sure what the "support the athletes" headline  is about. Apparently the Czech and U.S. flags have the same red, white and blue color scheme and it just refers to showing team spirit; I don't see anything about actual money going to the Olympics.

Besides promoting the Olympics, Preciosa was also using the pattern to introduce its new pressed-glass Twins, which allows the company to manufacture them in many more colors.

I think this pattern has the worst name in the world--"bracelet with small bells"--because the junky jingle bells are the most forgettable thing about it. What's really cool is the illustration that shows the beaded beads done up with spirals, stars, zigzags and diamonds. (The pattern schematic shows only the spiral, but once you made that, maybe you could decipher the patterns for the other designs shown.)

I'm highlighting only two patterns here, but there are many more on the Preciosa Ornela Twins website, plus an inspiration album.

[Previous I Might Make That! Monday entries can be found by clicking the widget at the top-right corner.]

Saturday, August 25, 2012

Bead Soup Reveal: Daphne of the Woods


The third and final reveal of the sixth Bead Soup Blog Party is upon us, and I have been stitching for three weeks on this one! I wanted to do justice to the lovely soup that Dot of Speedie Beadie sent me, and since she emailed me a sneak-peak of what she had made from the beads I sent her, I wanted to put as much effort into my creation and she did into hers.

I will also make you, dear reader, do a little work by posting step-by-step pics before revealing the completed necklace.

First off, here's the soup Dot sent me back in early July:


Crappy photo, I know, but there were tons of seed beads and bugles in shades of gold, brown and green, as well as some larger beads, coins and rings plus a raku face.

The point of the bead swap is to challenge yourself, and this was indeed a challenge, because the raku focal had no holes, and I had to figure out a way to make it the centerpiece of a necklace! My first thought was to bezel it, although I had never actually bezeled before.

My regular readers may recall that I blogged about my first bezel attempt a few weeks ago. (Dot, if you saw it, you were probably the only one to recognize your cabochons in the photo!) I started out doing the round cabs to get the hang of a peyote bezel, then I planned on tackling the diamond-shaped raku face. However,  after completing the cabs, I realized that in order to secure the face in a bezel setting, I would have to stitch up over the edges and thus partially obscure the eyes.

Gulp. Plan B: bead embroidery. I had gotten a copy of the Heidi Kummli/Sherri Serafini book The Art of Bead Embroidery several months ago and had vague ambitions to give it a try, but hadn't actually gotten around to it. A trip to a sewing goods store for Lacy's Stiff Stuff and ultrasuede backing were in order.


I thought the gunmetal green (I just made that color name up!) seed beads Dot sent beautifully matched the patina on the raku face, so I started with that. (Note that the Lacy's Stiff Stuff has been colored with a marker in a color I will call The Only Sharpie I Had on Hand Green. Yes, brown would have been a better choice, but I didn't have brown. I figured glimpses of green peeking through would be better than white.)

I had decided I wanted to make a freeform netting necklace like I did for a fairy tale-themed bead swap organized by Lori last year, which was inspired by the Wander With Color necklace design of Beverly Ash Gilbert. (It's on the cover of her book Beaded Colorways.) So I started pulling out all the seed beads in my stash in hues of brown, bronze, gold and green and stirred them up in a bowl to supplement what Dot had sent.

Beading round and round that raku face, I got to know that gal pretty well. In fact, she told me she was a wood nymph named Daphne, and that she liked to hide amid the tangled vines and leaves of the forest floor, so could I please whip up something like that to adorn her in.

Here's a completed Daphne gazing down on the bead soup, which she told me met her approval.


So OK, I had done bezeling and bead embroidery, two new things I had never done before, and I hadn't even started the main body of the necklace! I knew I could do the freeform netting, but I wasn't exactly sure how I was going to attach Daphne. I was just hoping that I could weave beads over and around and through her beaded edging, and that it would hold and look nice.

Here's how the "base layer" of netting looked just before I stitched Daphne onto it.


You'll see that I was working on a bead board. I was trying to learn from a mistake I made when I created my freeform necklace last year. I had stitched that flat on a bead mat, and it looked gorgeous, but when I put it around my neck, it didn't lay right, because I hadn't contoured it. I wound up stitching on several more rows while having it hang from a neckform in order to correct that.

So this time I used the bead board's furrows to create a U shape. This worked brilliantly until the necklace got too bulky, and it was a pain to rotate the board every time I got to an end and was ready to switch directions. I took it off the board and laid it on a mat.

This was my one mistake of the creation, because once it came off the board, it was hard to keep it balanced. One side would get a little wonky during the stitching, so I'd add a row of beads to smooth it out. Then I had to do the other side for balance. But wait, now this side is an inch longer. Let me add some to the top of the other side.... This went on and on, hour after hour over these past several days.

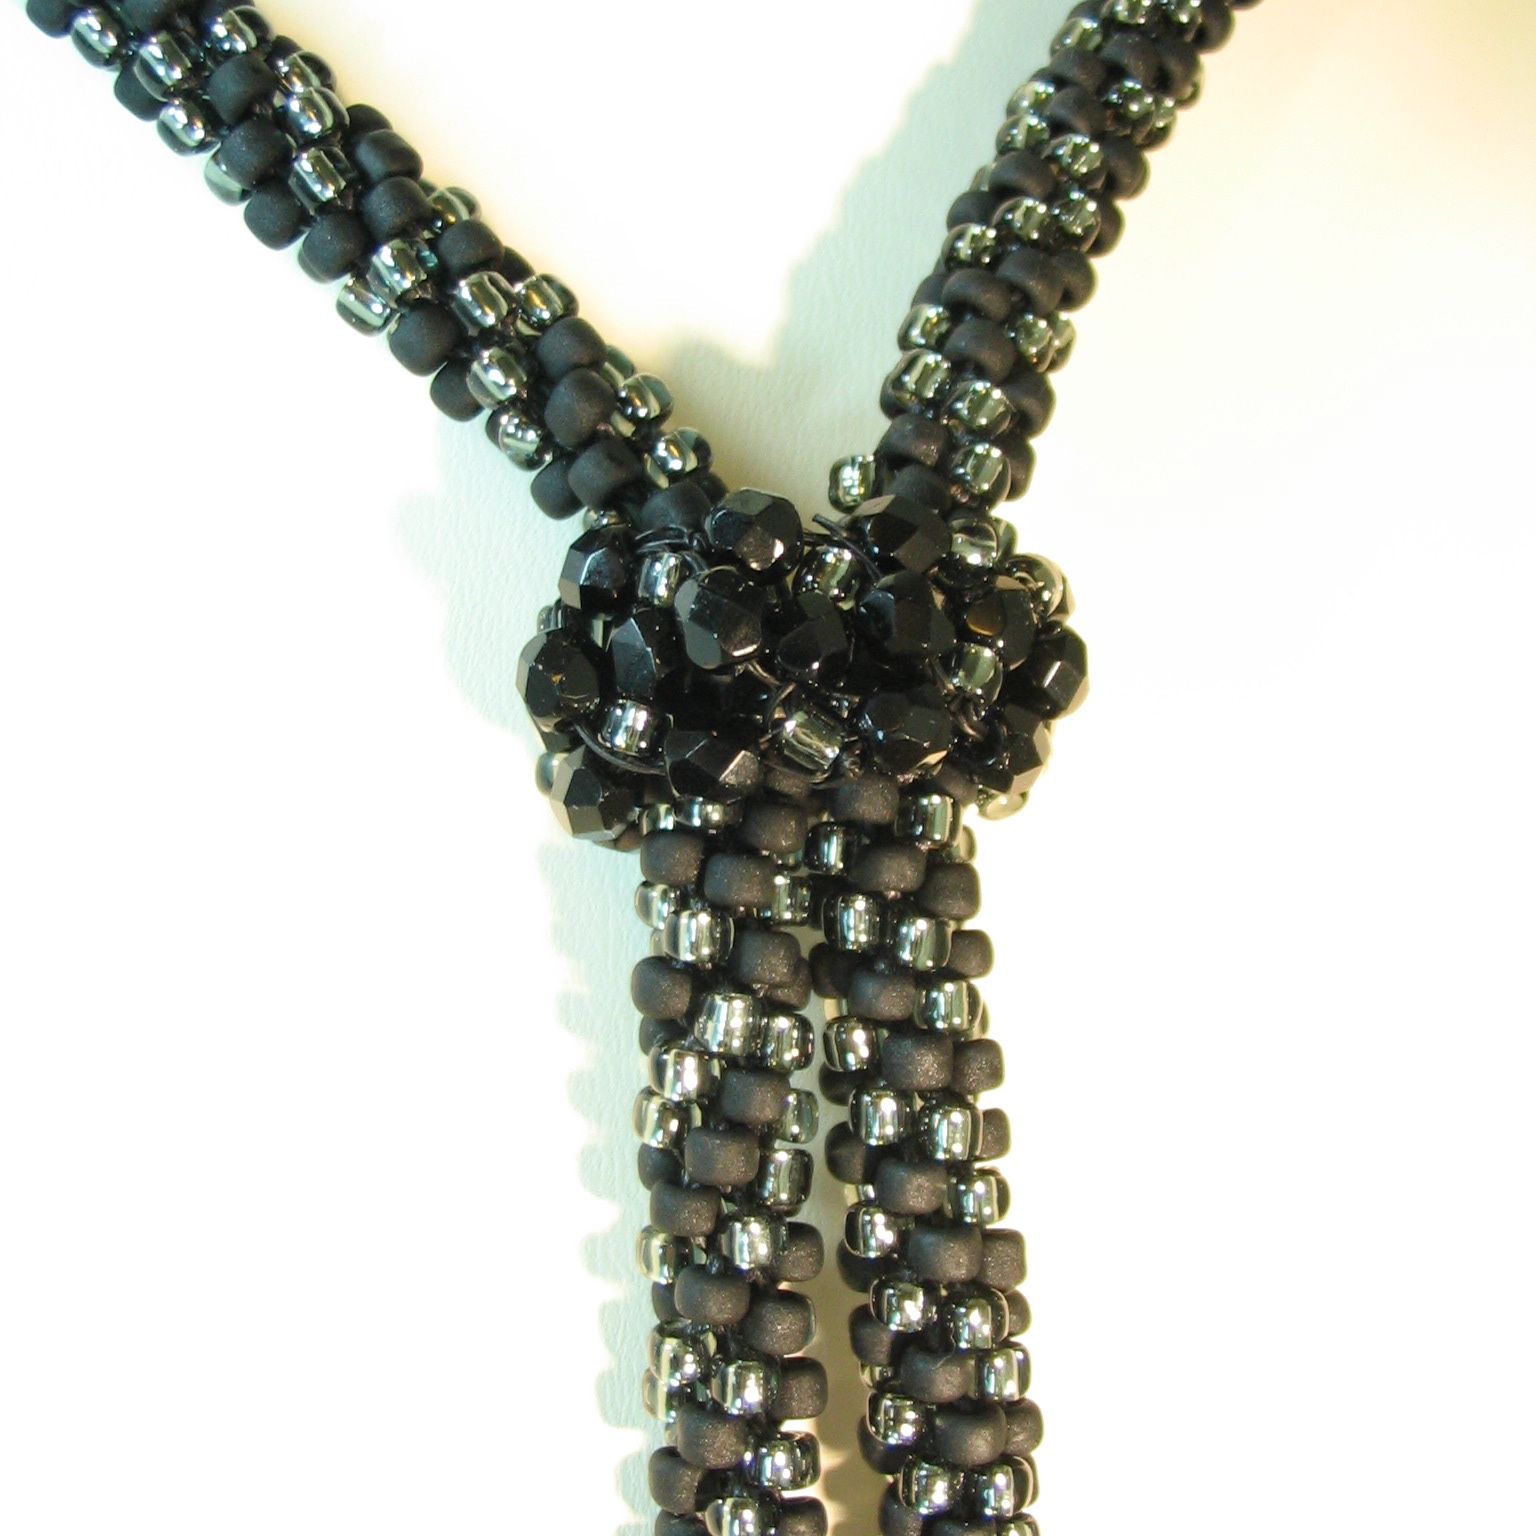
But here it is finished, your reward for reading this far!


A closeup:


I am absolutely thrilled with how Daphne came out--the swirl of beads does look like she is peeking out from a tangle of vines, as I envisioned. (You can't see it in the photos, but there is a little turtle bead at the top of the left shoulder that adds to the woodsiness--that was one of the special beads Dot sent.)

The piece is so dense with beads it feels more like beaded fabric draped around my neck than a necklace.This is one I'm definitely keeping for myself (A: I love it. B: I could never sell it for a price that represented the hours I put into it!)

Oh yes, about those bezeled cabs. You may have noticed they aren't part of it. I tried placing them in the design, but they stood up too high and took  attention away from Daphne, so they will shortly become a pair of beautiful post earrings for moi. 

I didn't use quite all of Dot's beads. I set aside two raku cubes to make coordinating earrings for the Daphne necklace, but I ran out of time before I could make them. They are next on my to-do list, because I'll want to wear them together with the necklace.

I also didn't get a chance to use the four green bead-frame circles or the gold Chinese coins, and I hope to make a bracelet out of those items. I still have a few of her opaque gold faceted rounds left too, although lots and lots of them were woven into the necklace. Lastly, there was a packet of wing-shaped French sequins. I have no idea what I will do with them, but they are so cool and unusual that I love having them in my stash until inspiration strikes.

Thank you for reading to the end of this long-winded post--please be sure to check out what my partner Dot made from the beads I sent her. And here is a list of the other participants in the 3rd reveal. So start hopping!

Hostess, Lori Anderson, Pretty Things

Agi Kiss, Moonsafari Beads 
Alice Peterson, Alice Dreaming
Alison Sachs, Beads by Earthtones
Amanda Dittloff, Passion Smashin'
Andra Marasteanu, Bijoux de Monanage
Angie Szlovak, SweetBeads
Anitra Gordy, Leelu Creations
Ann Sherwood, Ann's Blog
Arlene Dean, A Glass Bash
Audrey Belanger, Dreams of an Absolution
Barb Solem, Vivi Magoo Presents
Barbara Blaszczyk, laboratorim Flory
Bianca Odenthal, Zydies Glasperlen
Birgit Klughardt, GitesBeads
Bobbie Rafferty, Beadsong Jewelry
Bonnie Coursolle,  Jasper Gems
Cece Cormier, The Beading Yogini
Charlene Jacka, Clay Space
Cherrie Fick, En La Lumie're
Cheryl Foiles, Get Your Bead On
Christie Murrow, Charis Designs Jewelry

Christina Miles, Wings n Scales
Christina Stofmeel, Feng Beads
Christine Stonefield, Sweet Girl Design
Cindy Cima Edwards, Live to Design
CJ Bauschka, 4 His Glory Creations
Claire Smith, Embergrass Jewelry
Cynthia Riggs, Cynth's Blog
Dana Fowler, Trunk Full of Treasure
Dawn Pierro, Turtle Moon Designs
Dee Elgie, Cherry Obsidia
Donetta Farrington, Simply Gorgeous

Dot Lewallwn, Speedie Beadie
Eileen Snyder, Dorset Hill Beads
Elizabeth Bunn, Elizabeth Beads
Eva Kovacs, Ewa gyongyos vilaga!
Evelyn Duberry, Sheba Makeda
Fay Wolfenden, Torch Fairy
Fen Li, Bead Flora Jewels
Gail Zwang, Angel Moose Enterprises
Geneva Collins, Torque Story
Grace Dorsey, Fan of the Flame
Gretchen Nation,  Art Food Lodging

Hannah Annear, Squintessential
Hajer Waheed, My Beaded World
Heather Goldsmith, As I Bead It
Heather Otto, The Craft Hopper
Heidi Kingman, My Bead Therapy
Hope Smitherman, Crafty Hope
Isolina Perez, Isolina Perez
Jacqueline Keller, CreARTelier
Jane Haag, Did You Make Something Today?
Janeen Sorensen, Wild Vanilla Designs
Jean Peter, Jean P. Designs

Jennifer Judd, Jen Judd Rocks
Jennifer L Justman, Soul's Fire Designs
Joanna Matuszczyk, Bizuteria z filcu
Joanne Brown, Jo's Jewels
Joanne Lockwood, Jo Bunkum
Joyce Becker, Joyce's Joyful Gems
Judy Riley, Three Red Beads
Karen Mitchell, Over the Moon Design
Karen Williams, Baublicious
Karin von Hoeren, Creative Ideen

Karla Morgan, Texas Pepper Jams
Kashmira Patel, Sadafule .. always in bloom!
Kate Richbourg, We Can Make That at Home

Katrin Lembke, AllesPerle
Kathy Combs, Torched in Texas
Kathy Lindemer, Bay Moon Design
Kay Thomerson, Kayz Kreationz
Kelley Fogle, My Life, One Bead at at Time
Kelly Hosford Patterson, Traveling Side Show

Klaudette Koon, Only Road
Lara Lutrick, Lampwork Beads by Lara
Laura Guenther, Blue Antiquities

Laurie Lalonde, Simply Mod Jewelry
Lilik Kristiani, Soul of My Embodiment
Linda Younkman, Lindy's Designs
Lisa Chapman, Beach Cat Beads
Lisa Lodge, Pine Ridge Treasures
Loretta Carstensen, Designs by Loretta
Lori Bergmann, Lori Bergmann Design
Lori Dorrington, Lori's Adventures in Etsy Land
Lupe Meter, Gem's PC Corner
Lynn Davis, LLYYNN

Malin de Koning, Beading by Malin
Mandi Effron, Craft-o-licious
Mandy Williamson, Mimi's Beading
Margot Potter, The Impatient Crafter
Maria Rosa Sharrow, Willow Street Shops
Marianne Baxter, Simply Seablime Jewelry
Marina Dobrynina, Savon Feutre
Marjolein Trewavas, Room for Change
Marelene Cupo, Amazing Designs
Marsha Neal, Marsha Neal Studio

Marta Kaczerowska, uhuhu
Mary Govaars, MLH Jewelry Designs
Melissa Trudinger, Bead Recipes
Menka Gupta, Menka's Jewelry Blog
Michelle Burnett, Reverie and Revival
Michelle Escano-Caballero, The Cabby Crafter
Miko Wiropati, Uniquely Yunikua
Milla Hope,  LB Creative Arts and Crafts
Mimi Gardner, Other Curiosities
Miranda Ackerley, MirandackArts
Natalie McKenna, grubbi

Noemi Baena, fuego, metal, y color
Pam Ferrari, Ferrari Originals
Pam Sears, Crazy Creative Corner
Penny Neville, Copper Penny
Rachel Baron, R. Baron Designs
Rachel Myers, Rockabead Jewelry
Rana Wilson, Definitive Designs by R. Wilson
Rebecca Anderson, Song Beads
Rebecca Sirevaag, Becca's Place
Riki Schumacher, Riki Jewelry

Rose Binoya, Ahtee's Blog
Rossana De Gaspari, Rdegas Blog
Sally Anderson, Wild Sally Road
Sandi James, Do Be Do Bead Do
Sandi Volpe, Sandi Volpe
Sandra Wollberg, City of Brass Stories
Sarah Goode, Pookledo

Sarah Small, blog by salla
Shai Williams, Shaiha's Ramblings
Shawn Mills, Shawn Marie Designs with Bent Wire
Sheila Davis, Stone Designs by Sheila

Sheryl Stephens, Babble Bead
Shiraz Biggie, Secret Song Designs
Solange Collin,  Ahowin Handcrafted Jewelry
Sonya Stille, Dreamin' of Beads
Stephanie Dixon, The Dixon Chick
Susan Kennedy, Sue Beads
Susan Sheehan, Strands of Thought
Suzann Sladcik Wilson, Beadphoria
Sweet Freedom, Sweet Freedom Designs
Tabatha Dinger, Modernly Created
Tania Hagen, Pelima Jewellery Design

Tanya Boden, Fusion Muse
Terri Gauthier, Blooming Ideas
Terry Carter, Tapping Flamingo
Tracy Stillman, Tracy Stillman Designs


Monday, August 13, 2012

Gold Burst for I Might Make That! Monday

Margie Deeb's Gold Burst
in several colorways
I know I have gained several new followers in the past week or so since my book giveaway (congrats, again A Polymer Penchant!), so I want to welcome all newcomers and re-introduce this feature.

Each week I highlight a new tutorial or technique for I Might Make That! Monday. The only criterion for selection is that it must be something I haven't tried and would want to learn or aspire to.

I recently stumbled on Margie Deeb's website, thanks to a mention in one of the Beading Daily blogs. That feature talked about her color work and her color wheel--topics I'm very much interested in, so I went to her site to learn more.

I discovered a wealth of beadwork patterns--many of them free--using peyote, brick, square stitch or a loom. Gold Burst, shown above, is my favorite of the freebies. It can be done on a loom or in square stitch. Hmm. Maybe this will be my introduction to square stitch.

If you're new to Margie Deeb, or to her site, I urge you to click around and explore. There are preview PDFs from her book The Beader's Color Palette, a gallery of her lovely work, and so much more. I signed up for her e-newsletter.

[An archive of past I Might Make That! Monday selections can be accessed by the widget in the top right corner of this blog.] 

Monday, July 30, 2012

Triangle Star for I Might Make That! Monday

Triangle Star from Eva
Maria Keiser designs

[Looking to sign up for my Bead Soup book giveaway? Click here!]


I recently stumbled upon the amazing blog of Eva Maria Keiser Designs. She has hundreds of followers already, so some of you may already be familiar with her site. I wish I could remember how I got there so I could credit the person who led me to her.

Seeing the beaded chess pieces featured on her home page banner will make you gasp, but even more impressive are the resources you'll discover once you start digging. If you click the link on the banner underneath that says "Complimentary e-Patterns," you'll be taken to a page that has links to instructions for all kinds of beaded wonders, like the Triangle Star shown at left (Sorry for the crappy photo, but it is a screen grab from the PDF.)

Lookie here for a sample:

Some tutorials available at Eva Maria Keiser Designs


Clicking on the "more tutorials" link reveals even more riches. If Eva Maria Keiser is new to you, I'll just go ahead and say "you're welcome" now, because I know you'll be thanking me.

An archive of past I Might Make That! Monday entries can be accessed at the widget in the top right corner. 

Monday, June 18, 2012

Beady bow for I Might Make That! Monday

"Corrupt" bow-- free tutorial from Stalker
I spotted this ginormous beaded bow necklace tute on Pinterest a while back. 

The site is Russian--and presumably the designer is, too. I'm using Chrome to translate, and it appears to be credited to an artist who goes by Stalker, as you can see from the image stamp. This site looks to be a roundup of various Russian bead artists' work.

Anyway, the instructions are accompanied by very good closeup pics and schematics. I like how it's not just strung from a single organza ribbon--look closely and you'll see that there's a strand of beaded wire intertwined with the two types of ribbon. I think it looks much more finished and balanced this way.

Wouldn't this bow would also look cute on a purse or as a brooch, perhaps anchoring a scarf?

The artist calls this a "corrupt" bow--not sure if that's just translation weirdness or perhaps she means it's not a true tied bow, just shaped pieces stitched to look like one.

An earlier post from this site shows the bow in seven color palettes and a couple of different sizes.

And, as always, past editions of I Might Make That! Monday can be found by visiting the IMMT!M link in the top right-hand corner of the blog. 

Tuesday, June 12, 2012

Artfire Bead Swap reveal


I am chagrined that I am nearly a month late posting these pics, but (sigh) life got in the way. Earlier this spring, I participated in the Artfire Beadweavers Guild bead swap and received some lovely beads from Barbara of Beads of Spirit.

The reveal date was May 15, but I was only a few inches into my beaded rope by then, because I had been so entrenched in my big class final project (which consumed all my waking hours outside of work for about three or four weeks). I made a frantic push to get it done before going on vacation, but I still had a few inches to go, plus the finishing. I finally completed it Sunday night and took some pics this (Monday) evening.

Here again are the beads that Barbara sent me:


As you can see, there is an assortment of amber gold, silver and black beads, in addition to the glass focal and silver clasp. The rules of the swap were that you had to use the focal and the clasp, but were free to add beads from your own stash.

From my collection, I used some silver-lined gold twisted bugle beads from Fire Mountain Gems, which have this cool duotone effect (they look silver in some light and gold in another), as well as some champagne-colored No. 11s from Accents Beads to the mix and then created the rope using a variation of Russian spiral.

To showcase the glass focal, which Barbara said was from Unicorn Beads, I created a bail from three gold oval hoops that I wired together at the bottom only. This caused the top to splay out in a pleasing manner. I then joined the bale and focal with a beaded circle made of some lovely faceted rondelles she included. It's hard to describe the color, almost pumpkin really, but they match the burnt umber of the focal perfectly. (They're in the photo right next to the focal, atop some black beads, but really hard to see. )

The bail was made to be large enough to slip off the necklace, so that the rope can be worn by itself or with another focal. It's about 22 inches total.

Here's a closeup of the clasp, which I was especially taken with:


Some notes on the finishing: Because this type of Russian spiral (made with the bugles) doesn't have a lot of support, I lined the rope with 2mm black cording. I had some cones on hand that had top openings wide enough to slip the cord through some jump rings and then back through the holes. The ends of each cord were then sewn together and tucked down inside the beaded rope.

I'm pleased with the end result. And I am relieved that I am finally done, because this was a karmic debt hanging over my head. This is the first time I've ever blown a bead swap reveal date. I've decided not to participate in any more swap reveals until I finish school next spring. It's just unnecessary, crazy pressure to put on myself.

Saturday, July 16, 2011

Some new-ish work

Black Beauty
Somebody remind me again why I decided six months ago that it would be a good idea to (a) launch an online store, (b) start a blog, (c) continue going to graduate school and (d) keep my full-time day job.

I finished several pieces in time for the crafts show last month, but haven't had time to take photos until today.

Above is the first beaded rope that I have made entirely on a marudai, not a handheld foam disk thingy. It was inspired by this necklace, which was made on a foam disk thingy. That piece had so many admirers that I knew I wanted to made more versions of it.

The previous necklace, as explained in the April post, was made in two parts. My original plan was to make this new necklace long enough that I could simply tie it into a square knot, lariat-style.

It's plenty long, but the knot proved clunky. So I decided to simply join the necklace by adding a slider made with Czech fire polish in a simple right-angle weave band.

Here are some closeups, but I must say the silver-lined beads are so glittery that they make this piece hard to photograph well:


One of the reasons I wanted to learn to use the marudai is because everyone said braiding went so much faster on the stand than on a foam disk, because you move both hands at once. That's true for textile braids, as I learned in the kumi workshop I took, but when you're making an eight-strand braid and dropping a bead at every turn, it's less so. You can try to move two strands at once, but you have to make sure the beads "catch"--i.e., that they're in the proper position at the point of braiding so that subsequent strands lock them into place. For me, that translated into dropping one of the tama (bobbins) at almost every turn to poke the bead into place with my finger. 

I'm sure I'll get faster with practice. Eventually, I'd love to take a kumi workshop that focuses specifically on beaded braids so that I can make jewelry like the amazing Adrienne Gaskell (which probably means, duh, taking a class from her. I've been eying her touring schedule for months to see if she's coming anywhere near me.)

And here's a non-kumihimo project--a Cellini spiral necklace that I blogged about back in April. It was going to be my donation to a silent auction at my daughter's high school, but it was taking so damn long I was afraid I wouldn't finish in time. 

Golden Glow

At the crafts fair last month, this was the bling on my table that stopped people in their tracks and made them come over to stroke it, squeeze it, study it to see how it was made. (But no one bought it.) 

I made matching earrings using some clever findings from Fire Mountain Gems-- tiny perforated beading disks that fit into post earring findings. They, too, had admirers (including my daughter), but no takers. 

They remind me of fireworks--so much so that I had planned to post a pic of them on the 4th of July. But Hell already has enough roads leading to it that are paved with good intentions, so I'll take a detour.

I've completed some other pieces as well, but these were all I had time to photograph and list in my Artfire shop. (And the next task on my to-do list is to to figure out why my pics look so dark and crappy on ArtFire. They look better on my blog. Are there otherArtFire artists out there who can solve this riddle for me?)

I know that learning to take great photos of jewelry is an art in itself. This blog has already made me a better photographer. (Lesson 1: Turn off the flash. Lesson 2: Find the macro setting on your camera. Lesson 3: Clear your local Target's shelves of daylight-spectrum lightbulbs and commandeer every small lamp in your house when attempting to take photos with no natural light available.) See?